Flashes are instantaneous light sources used to illuminate a scene. Usually cheaper cameras have built in flashes, which are inconvenient because they cannot be directed from any angle other that dead on in line with the camera. Usually, these cheap flashes are not strong enough to illuminate a scene for more than 3 or so meters in front of the camera.
In professional and more advanced photography, flashes are typically mounted on "accessory mount brackets." In this case, they would be synchronized with the camera's shutter to illuminate the scene when necessary.
Flash is most useful indoors (for example in a studio) when the light is not strong enough on its own. For example, in this case, flashes are used to freeze movement. While very fast shutter speeds needed to freeze motion would not let in enough light, flashes are used to provide that light so that fast shutter speeds can be effectively used.
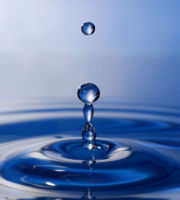
In this photo from Wikipedia: Flash (Photography) the movement of a water droplet is frozen by using a flash - adding the extra light that is lost by using such fast shutter speeds needed to freeze the motion.
A similar thing is done with hummindbirds from Hummingbird High Speed Flash Photography

These flashes can be directed either straight towards the subject, from any angle, or by "bouncing a flash." This technique includes pointing a flash upwards to be bounced off of something white, either a ceiling or a "bounce card." The effect of this is to lessen shadows and glare and to create more natural lighting circumstances. Of course the down side to this technique is that some of the intensity of the flash in comparison to a direct flash is lost, so a stronger flash will need to be used in order to compensate for what is lost.
Another benefit to using a flash not mounted on the camera is that redeye can be prevented. When photographing a subject looking straight at the camera, a mounted flash will reflect off of the retina, resulting in redeye. However, when the angle of the flash can be adjusted, redeye can be eliminated.
Light Meters
Metering before shooting a picture is necessary to determine what settings (shutter speed/aperture) are needed to expose the subject of scene correctly. This test strip from Wikipedia: Exposure (photography) shows how different settings affect the same scene by giving different exposures.

Some subjects reflect light in a strange way, or light is reflected differently at different points so light metering is important so that some of the picture is not under or overexposed. The circumstances when light metering is very important due to changing light conditions are snowy scenes, sunsets, and clouds.
For example, a sunset is chosen from Light Metering . The series of images demonstrate that where the light meter is pointed is important. When taking a sunset, there is a wide range of light intensity (very bright at the sun and clouds closest to, very dim further away). If you were to point the camera at the sunny part and take the readings on the light meter indicated there, the clouds far away would be underexposed and turn out very dark, as shown in the middle image. Oppositely, if you aim at the clouds far away, the light meter would assume the whole scene is very dim, and hence overexpose the sunnier parts, shown in the bottom image. To get a compromise, you should aim at a part of the photograph which has mid-range light intensity. The camera must have a manual function to do this.

Some hints for light metering: Try to aim the light meter at the neutral grey part of the scene. Otherwise take the extreme values and try to find an average value. Also, check your light meter from time to time against that of other cameras. When taking a lanscape photo, remember to meter on what you are taking. If you are taking the ground, do not meter the sky, if you are taking the sky, do not meter the ground. A grey card (18%) can be used to determine the amount of light being reflected off of the subject. and 18% grey color is the color all light meters are calibrated against, so it can be placed on the subject or in the scene to determine how much light is really being reflectd (in otherwise tricky situations like snow) and gain the right settings for good exposure.
Guide to using a hand-held light meter shows the proper way to use a grey card.

This image from Wikipedia: Exposure (photography) shows a long exposure time. A light meter was needed to determine the settings in between the bright background and dim foreground that would properly expose the entire image. In this case the shutter speed was 25 seconds.

Guide to using a hand-held light meter shows the difference between using a handheld light meter (easier to use than pointing camera around) to determine the amount of light incident on the subject and the amount of light reflected back from the subject. In camera light meters can only measure the reflected light, yet sometimes the amount of light incident on the subject is very useful to know, as the value is not affected by strange reflective properties that the subject may have.


No comments:
Post a Comment