Overall, these prints show fashion shots. Some have to do with practical fashion, like muddy boots, and some show how clothing makes people tend to label people, like "jock" and "preppy popped collar." While these show stereotypical clothing of these so called "types" of people, the model is the same for each shot, thus showing that the fashion shouldn't define the person.
Shoes - Print One: "After Apple Picking"
Test Strip 1
Aperture: 5.6
Time: 6/8/10

I started out with these settings, only to result in a print that is too gray as well as too light. But it shows promise, because despite these flaws, you can still see some detail of the mud and texture of the ground.
Test Strip 2
Aperture: 8
Time: 6

For the next test strip I closed the aperture to try to create more contrast between the boot and the mid on top. This test strip succeeds more, showing the gravelly ground in the background with pepper like texture, as well as the slick boot in the front. Now the image is more clear, as you can see the clumps of dirt on the front of the boot, especially around the tready part.
Test Strip 3
Aperture: 8
Time: 7
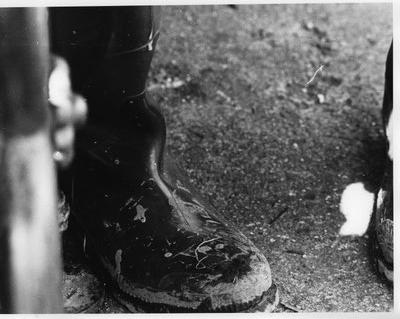
This time I increased the time to try to make the shade of the boot darker, and hence look slicker. This worked better in this print. Or it could be the larger view of the boot that makes it look like a smooth black boot muddied with texturized dirt.
Final Print
Aperture: 8
Time: 7

The final print shows the same characteristics as the test strip, just a larger view. In hindsight I wish that I had moved the paper to the left a bit more to get more of the bench in the image and hence create more balance. Next time.
Shoes - Print 2: "In the End"
Test Strip 1
Aperture: 5.6
Time: 6/8/10/12

The first strip already showed decent contrast, which I think was already a feature of this particular shot due to the slanting light and the textured ground. The shadows provide a nice break from the monotony of the ground. Overall, however, it is too gray.
Test Strip 2
Aperture: 5.6
Time: 12

This test strip provides a slightly larger view of the image, and proves more useful for determining how the image as a whole looks. In this case, okay.
Final Print
Aperture: 5.6
Time: 12

Overall I think that this print turned out alright. It is simple, but the shadows are prominent and the texture of the ground is very precise. I personally like this image because it tells a story of when we went off apple picking.
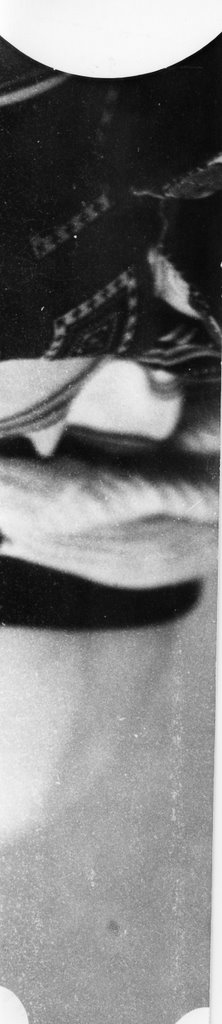
Shoes: Print 3 - "Gillian's Boot"
Test Strip 1
Aperture: 8
Time: 5/6/7

The first test strip came out much too gray. The curvy lines of the pattern on the boot look faded rather than sharp. The lack of variation between the boot and between what appears to be the region beside the boot makes the image look dull.
Test Strip 2 and 3
Aperture: 5.6
Time: 2/3/4
Aperture: 5.6
Filter: 3.5
Time:4/5/6


I opened the aperture and decreased the time for the second test strip, hoping to make the dark regions stronger, and to leave it in the developer longer to achieve this. For the most part, the resulting test strip looked almost identical to the previous test strip, so I knew I had to try something else altogether.
So for test strip 3, I added a filter and kept the aperture at 5.6, hoping to enhance the contrast this way. This showed improvement, for in comparison to those test strips without a filter, the designs on the boot are much more sharp and defined.
Test Strip 4
Aperture: 5.6
Filter: 3.5
Time: 5

This larger test strip shows a larger region with some of the same settings: 5.6 aperture, 5 filter and the chosen time of 5 seconds, as selected by the last test strip. this came out well, as the image is clear, and especially towards the bottom of the boot, although the image begins to get out of focus, there is still contrast between the mud and leaves on the ground.
Final Print
Aperture: 5.6
Filter: 3.5
Time: 5

I tried a full print with these settings, hoping the rest of this image would look alright. I was a little worried that it would turn out to look worse in the areas surrounding the test strips, since they only looked at the areas in focus, and the other bits may not look right. It worked out thought, as the print looks uniformly sharp and contrasted throughout. I think that the settings are right and the contrast is good, though I am not wild about the print as a whole. I think that the composition is not interesting enough and that the pose looks contrived. This is one of my least favorite prints from the project and if I had shot more images of shoes, I probably would've selected a different one.
Clothing - Print 1: "Jock"
Test Strip 1
Aperture: 8
Time: 6/8/10/12

This was my first print, and I got a bit lucky with it, as I was pleased with the 8 second portion of my first test strip. Already from the settings in the test strip, there was detail in the wrinkles of the hand and the texture of the ball. The shadows that are the folds of the sleeve are also quite defined, which gives the clothing depth, and I particularly like the contrast of the arm against the richly dark colored body of the jacket.
Test Strip 2
Aperture: 8
Time: 8

I did this test strip to see if the contrast carried over to other parts of the image, and how the region to the left of the model, my brother Matthew, looked. I saw that it looked fine, that it is a dark background bordered by a curtain. The dark background was also nice to make Matthew, and particularly the ball in hand, to stand out.
Final Print
Aperture: 8
Time:8

As I said before, this is my favorite print, and I am very pleased with how it came out, both developing-wise as well as composition-wise. It is nice in the large size, as even the t-shirt underneath shows and especially the details that make it obvious that it is my brother, even without seeing his face: the wrinkly hands and the rip in his t-shirt. Though I hope that the print is good besides this fact, I think that I like this one because it is quite personal to me.
Clothing - Print 2: "Preppy Popped Collar"
Test Strip 1
Aperture: 11
Time: 4/5/6/7

The first test strip was not exposed for enough time, as the image looks old and faded. The contrast looks promising, in fact in this case, the image looks too bleached out, so I opted to close the aperture to accompany an increase in time in order to make the dark parts more pronounced, partularly the pattern in the tie and the stipes in the shirt.
Test Strip 2
Aperture: 8
Filter: 3.5
Time: 8/10/12

I added a filter to help along the contrast, as the image does not look sharp to begin with. This made the shot more grainy, which I am not really opposed to, and made the range of shades (especially with respect to where the right side of the tie meets the white shirt) much greater. Still, as the time is increased, as seen between the 10 and 12 second segments, this effect is lost as the test strip gets darker, or dark enough.
Test Strip 3
Aperture: 8
Filter: 4.5
Time: 16
I increased the filter, since the 3.5 filter helped, but didn't add dramatically to the quality of the print in comparison to the test strips without a filter. I focused on the tie since the rest looks okay anyways and this region is where I want the priority of contrast to be judged from.
Test Strip 4
Aperture: 8
Filter: 5
Time: 19/20/21

Since the 4.5 filter helped more than the 3.5, I decided to use a very high filter to continue to improve the image. This had a more drastic effect, making the dark areas, especially the neck area, quite dark. I focused on a larger area to see the effect n the rest of the collar area, rather than just the tie,and also to see the coloring of the skin, which is fine.
Final Print
Aperture: 8
Filter: 5
Time: 20
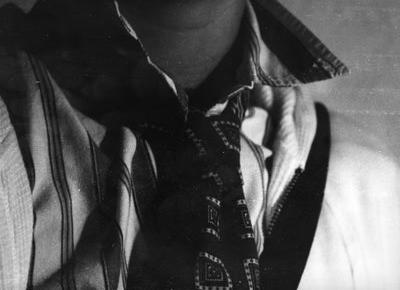
The final print shows good contrast and a nice compostion, showing off the patterns and fabrics of the clothes without showing Matthew's face. I am starting to like these shots that show only a portion of the whole, zoom in on a detail and give it more focus than it probably deserves.
Clothing - Print 3: "Matthew the Model"
Test Strip 1
Aperture: 5.6
Time: 8/9/10

I started with the settings used for some other prints taken in the same lighting, and so the first test strip already showed promise, with contrast easily visible. The pattern in the tie is clear, and the stipes of the shirt nicely visible as well. I especially like that the wrinkles in the shirt have dark shadows, due to the lighting. The face is quite dark, which could be fine since hte purpose of the image is the clothing, but which could also be a non-issue since this side is the dark side of the face due to the lighting anyways.
Test Strip 2
Aperture: 5.6
Time:6.5

The second test strip shows a larger portion of the print, showing that the face is indeed visible on one side. The time is decreased, which softens the shirt somewhat. The contrast is very pronounced. Perhaps too much, for the face looks odd, but in this case, I kind of like it since it just makes the patterns all the more noticable.
Final Print

The final print turned out nicely, except for the part of the hair that has a chemically blur. While the pose is a bit too typical, it still makes for a somewhat interesting print.
Accessories - Print 1: "Messing Around"
Test Strip 1
Aperture: 8
Time: 6/8/10

This test strip shows that the image is too out of focus. The soft shading, due to not enough exposure time, makes this obvious. I decided the keep going with this one although it may be out of focus becuase the composition was nice.
Test Strip 2
Aperture: 5.6
Time: 6/8/10

I closed the aperture to make the image less bleached out and more uniformly shaded, to make the hat more pronounced. In this case, the nose and lips look better, still out of focus, but tolerably so, like it was done on purpose. The hat is too dark, but that is because the settings at 10 are too dark. Since the face region looks best between 6 and 8 seconds, I decided to try a full print at these settings in hopes that the hat would lighten up and be more detailed.
Test Strip 3
Aperture: 5.6
Time: 7

This print I left in the developer too long, for even though the hat now is in focus and visible, the face is too dark that it just looks awkward.
Final Print
Aperture: 5.6
Time:7

When I didn't leave it in the developer too long, it came out much nicer, as the cheek bones and details in the face are now visible.
Accessories - Print 2: "Margotje and Bea"
Test Strip 1
Aperture: 5.6
Time: 8/10/12

I started with the times that were similar to other prints. This test strip is too dark. While I really like how the earring pops, the rest blends together too much, though I don't think that it is a contrast problem, rather the fact that it was exposed for too long. One other test strip at 6 seconds looked much better, but I didn't include this one since it is the same as the final.
Final Print
Aperture: 5.6
Time: 6

This final print came out really fun. I am not sure that peoples faces are my stong suit, but I think that this one turned out alright, as the eyes look dark in the places the should and the skin tone looks normal, but still shows a level of detail. I also like how fun and unposed this one is, since Bea's in the background, and in the photo by accident, but in a good way.
Accessories - Print 3: "ManBag"
Test Strip 1
Aperture: 5.6
Time: 5/6/7

This print was easy, since I started with the settings that I used for another in the same lighting conditions. Immediately it looked okay, with the darker end the best, around 8 seconds. There is enough detail in the shirt. The only think that is lacking is detail or texture in the bag. I think that I was focusing on the shirt rather than on the bag that Matthew's hand is holding on to.
Test Strip 2
Aperture: 5.6
Time:7

At 7 seconds, the rest of this region looks fine, just a little washed out, so there needs to be more time for the final print.
Final Print
Aperture: 5.6
Time:8.2

I raised time to 8.2 seconds just to be safe. And was pleased with the result, though I would have liked if the other accessories I had photographed came out so that this same outfit wasn't made into three prints. I like the pose and the balance between dark and light in this shot though.


