Light comes in two ways, HARD LIGHT and SOFT LIGHT. These two are called light qualities.
Hard Lighting
What it does: Hard light can create a dramatic effect. This sets shadows in certain places, and the direction from which the light shines (as seen by the subject) is also discernable from the final image. Used to make an image, bold, angry, or serious, etc. For example, if you are shooting a subject with wrinkles, hard light will make those stick out. Otherwise, hardlight will show the "chiseling" of features, and produce bright highlights in the eyes.
How to Achieve Hard Light: Hard light comes from point light sources: an electronic flash, the sun, or a studio light. Remember also that there is a difference between sunlight streaming into a window and daylight. Daylight is a combination of sunlight and skylight. When using a bulb, "barn doors," the adjustable flaps on the sides of the studio light are used in order to control where that light goes. For example, sometimes you may wish for hard light on the subject's face to define their features, but soft light on their shoulders.
[As for direction of light, this comes in three ways. First, there can be a front light, used to show detail. Usually used in the form of soft light and not hard light. Second, there can be a side light. This is useful in showing texture (think of a sideways light making sideways shadows over something bumpy, these "stick out" more. Third, there can be a backlight. This is a light placed directly behind the subject, and makes for a dramatic image. It can also separate the subject from the background. The light is usually softened naturally as it must first come in contact with the subject before reaching the film.]
Hard Lighting example [Photo taken from this page.]

In this case, hard lighting is used to help show texture. While soft lighting would have dulled the texture, hard lighting takes advantage of the ridges and bumps of the cactus, as its hards shadows define them.
Soft Lighting
What it does: Soft light is light that comes from a reflected source or a broad source. It is indirect light that doesn't throw shadows, rather, evens out the distribution of light. This is because there are many paths that the light can take before reaching the subject and the film, whereas hard light is intentionally directed in a certain direction.
How to Achieve Soft Light: Soft light can be found in an over cast sky, a large window that is close the subject, or a bulb reflected off of and umbrella [or a brollie if you prefer]. Soft panels also are a way to achieve soft light. They consist of one black panel, and one white panel. The light source can be controlled in that moving it closer to or away from the subject will change the size of the source.
White or Silver Brollie? When you use a silver lined brollie and reflect light off of it, the light slightly softens, and about half of the light reaches the sunject as opposed to a naked bulb. White brollies can be used in two ways. First, you can reflect light off of the brollie, which yields roughly the same results as a silver lined one. Or, you can shine the light through them, which results in a slightly harder light. If you choose to use a brollie, then you will get a diffuse light source, which means that it is light coming at all sorts of angles. The effect of this is that The opposite of this is a specular source, which is organized into parallel rays.
Soft Lighting example [Photo taken from this page.]

In this image, soft lighting helps to set the mood or emotion for the picture. Hard lighting would have been too harsh, but soft lighting makes the image stagnant and calmed.
Three-Point Lighting
Three point lighting consists of three separate lights, used to manipulate light to either make shadows prominent, or non-existent, whichever the artist prefers.
The Key Light is the main light used. In indoor shots, it is a specialized light, or a flash. In outdoor shots, it is often the sun. The most common way to situate the key light is at a 30-60 degree angle with respect to the camera. A very high key light will create prominent shadows that make the cheek bones very defined. A low key light distorts the subject and creates an eerie effect. As the "principal illuminator" it is the most important to the overall lighting design of the photograph.
The Fill Light helps to make the image look more natural. It is often a light shone at an angle to the key light, usually a right angle, which minimizes those shadows created by the key light, under the nose, by the ears, neck, and so on. Sometimes a low fill light can be used on purpose in order to achieve some sort of stylistic effect. A fill light significantly less bright than the key light will result in a more contrasted image, while one closer in brightness to the key light will result in less contrast. Occasionally, this is not even a separate bulb, rather, a large white sheet, white wall, or reflective material used to bounce the light from the key light at a different angle to fill in the shadowy areas. This should be placed close to the subject, as it is a softer light.
The Back Light shines from behind (not always directly, sometimes at a slight angle) and serves to separate the subject from the background. In the following image taken from here, the difference between no back light and a back light can be seen. The image on the right, with a backlight, is more distinctive than that on the left, with a nice rim of light surrounding the subject.

A website that shows how the combination of these three lights effects the subject and where the light and shadow parts hit can be found here.
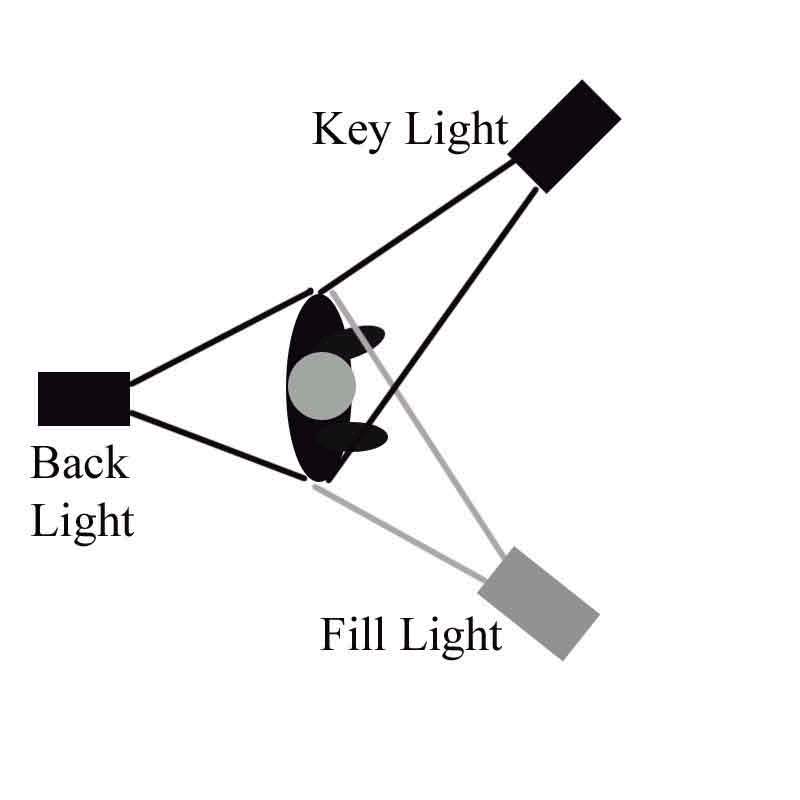
Three point lighting diagrams
a) This diagram, from here, shows where the light hits, and also shows the relative intensity of the lights.
b)This diagram, from this site shows a three point lighting system using a reflector as a fill light, rather than a separate bulb.

Sources
1) http://www.scphoto.com/html/lighting.html
2) http://photo.net/learn/studio/primer
3) www.3drender.com/light/3point.html
4) http://en.wikipedia.org/wiki/Three-point_lighting
5) http://www.geocities.com/iconostar/three-point.jpg
6)http://www.ourvideo.org/toolkit/files/webimages/pics/threepointlighting.jpg


No comments:
Post a Comment